Friday, January 28, 2011

Counterfeit Kit Challenge Blog Hop!


Welcome to the Counterfeit Kit Challenge Blog Hop!  We are excited to get a chance to visit with some of our friends today and hope you will be inspired with what you see!  Don't forget to leave them a comment when you stop by their blog!  Everybody needs a little love!

Today's blog hop will be based on our Roll the Die Challenge!  Our challenge was to create a card inspired by fashion that has some bling on it.  Are you ready to see what we all came up with?

Here is the complete list (in order) of the blog hop participants in case you get a little lost on our hop.  Each blog should have a link to take you onto the next blog on the list.  You will end up at my blog!  Let's get hopping!

Meridy
Susanne
Debbie
Gabrielle
Glinda
Melissa
Margi
Bethany

Our first take on our challenge is from our own Meridy so head on over to Meridy's Blog !  Don't forget to leave her some nice comments!

Wednesday, January 26, 2011

Coming in February...


Well, our first month of Counterfeit Kit Challenge is coming to an end.  We want to say thank you to everyone for joining us here!  We are having so much fun with this challenge blog.  We hope all of you are too.  We love that so many of you have joined in, shared ideas, and displayed your kits and creations.  We have a few additions to our blog in store for you for February. 


So, without giving ALL of our secrets away...here are a few hints. 

  • Keep your eyes open for a Design Team Call in the very near future.  
  • Or, if being on a Design Team seems intimidating, or overwhelming, how would you feel about being a Guest Designer for a month??? 
  • And who doesn't like to win free scrapbook supplies?  We're working on that too!

Have fun following the blog hop on Friday!  And keep your eyes open for the Design Team Call (hint, hint).

Tuesday, January 25, 2011

The Great Tootsie Pop Question...

Since the dawn of time there have been unexplained mysteries in life.  Things beyond our comprehension.  Questions we are forced to ask and try to answer...
Like how many licks does it take to get to the center of a tootsie pop?  (Yep...I even have a t-shirt of this one!)

Like the mysteries of old, the Counterfeit Kit Challenge is raising it's own intriguing question:

How many projects can you make out of your Counterfeit Kit?  

So what is your answer?  How many projects have YOU been able to make out of your kit this month before you pilfer what is left for your scrap paper drawer?

Stop on over to my blog to see MY answer and the extra projects I have created this month.
Double Dog Dare You

Monday, January 24, 2011

Layout: "Time for Some Fun" (Sketch Mini Challenge)

Here's my take on the Sketch Support mini challenge...


Everything I used in this layout was from my Counterfeit Kit and Counterfeit Add-On.  I have found that I really use my supplies to the fullest when I put them into these Kits.  For example, I have lots of colors of DMC floss that I purchased (years ago) with the intention of adding them to my layouts.  Everytime I sit down and scrapbook, I forget about them.  Since I included this yellow floss in my Counterfeit Kit, I found it was a great finishing touch to my layout.  Yeah for using my supplies to their full potential!

Are there any old supplies that you finally got around to using since you included them in your Counterfeit Kit?

*Meridy*

Sunday, January 23, 2011

Harry Potter (Sketch Mini Challenge)

My kids are getting WAY too into seeing what I make with this months kit...and trying to help me with ideas.  LOL  Sometimes the input and time together is nice.  Other times...get out of my room!  There was no keeping my son out when he saw that I was ready to do Halloween pics of him dressed as his new obsession, Harry Potter.  He had fun helping and giving suggestions.  Lots of suggestions.  Complicated suggestions.

Here is my take on the sketch:


The patterned paper in my kit wouldn't have been my first choice with this theme, but I think it works fine.  I used my cricut (Paper Dolls Cart) to make the cut outs.  Do you recognize my title?  It is cut out from the alphabet paper in my kit.  I think it works perfectly!  So what are YOU working on for this challenge?  I hope you will share it with me either on that challenge post or on our Facebook.

Friday, January 21, 2011

Mini Challenge: Sketch Inspiration


One of my guilty tv pleasures is Top Chef.  I love watching all of these talented chefs create these amazing meals out of their own heads!  Someday I would love to learn how to do that.  I enjoy cooking, but I pretty much need a recipe to get me started.  I add my own touches and change things to fit my families preferences, but it all starts with a recipe for me. (Check out my famous chocolate cookies, would you?)


I am the same way with scrapbooking.  If I can get some uninterrupted time and sit down for a while, I certainly can come up with my own scrappy creations.  Unfortunately, I don't always have that kind of time (or lack of interruptions with a husband, 2 kids, 3 cats and a dog!)  I always appreciate a little big of good old fashioned inspiration.  Sometimes it comes from a project on a blog or a gallery or magazine.  A lot of times it comes from a sketch.  Those are my go to recipes.  I have developed "crushes" on a few sketchy artists who really fit my style and offer sketches that I can really put my personal touch on!  One of my crushes in Allison Davis from Sketch Support.  There has been quite a buzz on 2 peas about how wonderful her sketch books are.  You can check out her wonderful sketches for yourself now on her new site Sketch Support!

I am excited to use one of her great sketches for our mini challenge today!  I think this sketch is fantastic because of the opportunity to get very creative with embellishements. 

Sketch #2

Mini Challenge:  Use this sketch as your inspiration to create a layout (one or two pages) or even a card!  Make it your own by making it fit you and your style!  Then post a link showing us what you have created either on our blog or on our facebook page!

And before you all ask...here are some of my other "crushes" for your enjoyment!
52 Sketches/52 Weeks (no longer posts them, but they are all there!)
Sketchablilities
My Little Sketch Book

On your mark...get set...CREATE!

Blog Hop Reminder:  If you want to participate in the blog hop...you have until the 25th to e-mail us!

Thursday, January 20, 2011

Roll the Die Challenge Teaser: Card/Bling/Fashion

It was so much fun to create a card inspired by fashion!  I had alot of fun looking at different fashion blogs and at fun trends in some of my favorite clothing sites.  I ended up deciding to use this as my inspiration:
It is not something I think I could pull off, but I love the A-symetrical way the ruffles overlap each other.  Very cute!  Ready to see what I did with it?  Well, you will have to wait until the blog hop on the 28th!

Don't forget to e-mail us at Counterfeit Kit Challenge to be part of the hop!  The deadline is the 25th so I can have time to make a list and e-mail it out!

Wednesday, January 19, 2011

A very sweet RAK

One of our players is doing a sweet RAK on her blog!  Kim Strother is offering the kit she made for the challenge to one lucky person who leaves a comment on her blog by Friday! 

Head over to Love Joy Scrap and leave her a comment to get a chance to win!  Thanks, Kim for such a great RAK!

Tuesday, January 18, 2011

Mini Challenge: Roll the Die and Blog Hop info!

I have a short attention span.  I will admit it.  And I am frequently in need of fresh ideas for my projects.  I generally scrap alone, so it is fun to find new ways to challenge myself.  This is why I created the Creative Die!  I made this little project a little while back and enjoy giving them a roll when I want a new idea of what to do.
Every month you are going to Roll the Die with me and we will create our own projects with our kits based on what we rolled!

Here are the die that I made:

I just took 4 plain wooden blocks from Michaels and prettied them up a bit.
Color Die: Yellow/Green/Orange/Red/Blue/Brown
Project Die: One page layout/card/mini album/2 page layout/altered project/gift item
Inspiration Die: House/Gallery/Ad/Color Combo/Sketch/Fashion/Gallery
Element Die: Chipboard/Stamping/Bling/Metal/Paint/Ribbon

When I need a bit of inspiration, I roll one, two, three or all four and let them "tell" me what to create!

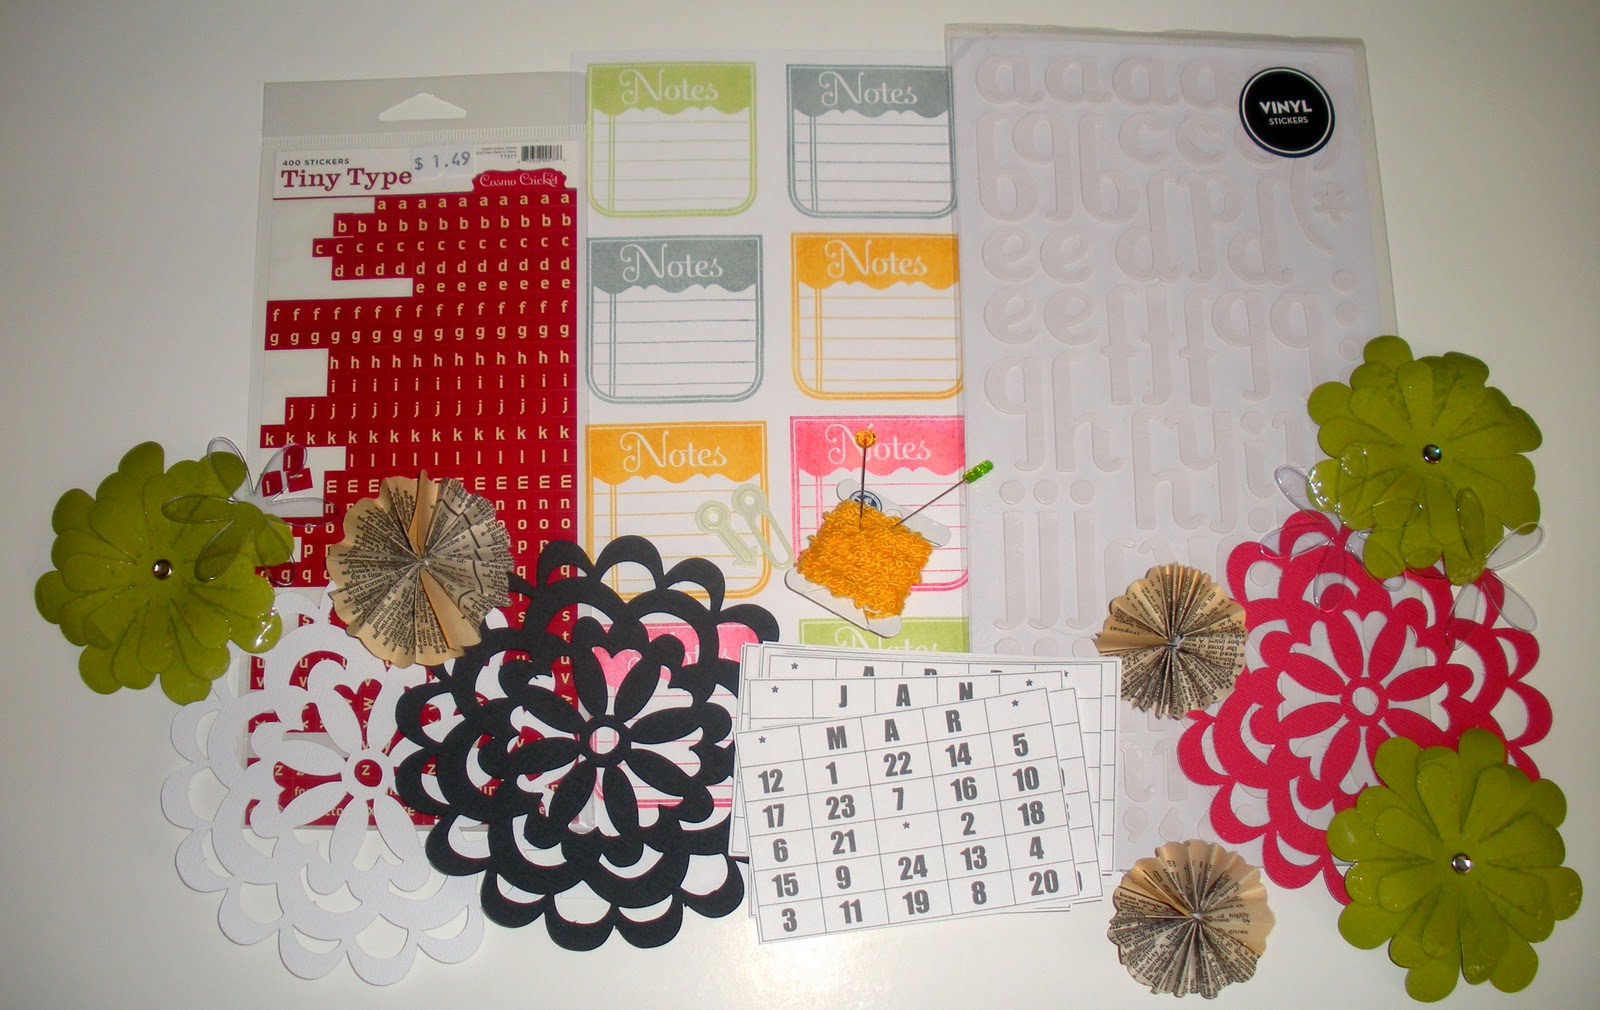
For our Roll the Die Challenges, we will not use the color die, since your kit will already be assembled.  Be prepared to add to your kit little bits based on the die we roll, though. 

Ready for our first Roll of the Die?


Mini Challenge: We will be making a card inspired by something from fashion and using bling!  That shouldn't be so hard!  And if you think you are not a cardmaker or have never tried it, I want you to give it a shot.  Pretty please?  For me?  I promise it won't be so bad!

After you create your card you will be able to participate in our end of the month BLOG HOP!  Won't that be fun? 

Blog Hop Details:
Create your assigned project and take a photo of it


On the 21st of each month I will remind you of the blog hop.  You will have until the 25th to e-mail me at counterfeitkitchallenge@yahoo.com with January Blog Hop.  In your e-mail please give me the link to your blog and be ready to publish a post with the challenge photo on the 28th for the hop.


I will put together a list of all participating blogs and will e-mail everyone the order of the blog hop and how to do their post!


On the 28th (or earlier if you want to schedual it to simply post on the 28th) you will create a blog post that shares your creation and them posts the link to the next blog on the list.  Easy!


On the 28th Couterfeit Kit Challenge will start off the hop and will direct people to the next blog on the list so we can enjoy each others work.

Sound fun?  You have until the 25th to e-mail me your interest in participating in the hop and until the 27th to finish your creation and make your post!  You will then publish that post on the 28th and the hop will begin!  If you have any questions, feel free to e-mail us (counterfeitkitchallenge@yahoo.com) or check out our Blog Hop Tab for more info!

Monday, January 17, 2011

Layout: Maddy (Back to School Mini Challenge)

I challenged myself to make a layout using ideas from the Products You Love Every Which Way: January 2011--Border Stickers class.   I was excited and motivated to try to use border stickers in a new way...I LOVE border stickers.  Choosing which border stickers to use was easy because they were already a part of my Counterfeit Kit since I love them so much!

I used two different ideas from the class on my layout.  First, I combines 3 border stickers to lay across my page, overlapping one another, and popped the top one up with pop dots.  Second, I used the tiny scraps from the various border stickers to embellish my journaling block.
I used the following items from my Counterfeit Kit:
patterned paper
tissue paper (from invoice)
stamped doily
border stickers
bingo card
beaded stick pin
"faux" vintage brooch
label stickers (for journaling)
journaling block (kraft color)

I pulled the following items from my stash to complete my layout:
2 sheets pink cardstock
2 pink butterflies
1 yellow butterfly

I decided to add the pink cardstock in order to coordinate the items in my kit with the pink accents in the pictures...which demonstrates just how versatile your Counterfeit Kit can be!  I also realized that I need to add more cardstock to my kits, otherwise I run out of cardstock before running out of embellishments and patterned paper. 

I decided to share another layout I created from my kit as well...althought I didn't use the mini challenge on this lay out, I thought you might still like to see it.   I only used supplies from my Counterfeit Kit on this layout.


Saturday, January 15, 2011

My Girl Layout (Back to school mini challenge)

I have really been enjoying seeing all of the wonderful kits and embellishement you have all been busy making. You have given me so many wonderful ideas! Thank you for that! Have you had a chance to look at the 2 Peas classes yet? I pounce on them as soon as they go live on their site. LOL Sigh. I love a good scrapbook video.

I did the stamping one earlier, so I decided to try the borders one for this challenge. I have to be honest. I am not really a sticker kind of girl. I'm generally the type who buys those cute BG packs and then gives the sticker sheets to my daughter. Who promptly sticks them all over her door. LOL It is only recently that I have fallen in love with alphabet stickers.

Border stickers...border stickers...do I even own any of those? Hmmmm.... I got out some great border stamps I have just in case I came up empty. Guess what? I own some border stickers. LOL Whoohoo! Since I already have my kit to use, I didn't really like the look of most of them with the paper I have already chosen. However, I did find some Heidi Grace Sticky Back Chipboard with a border that would work perfectly. Does chipboard count as a sticker? It does today!

I had my eye on this combination of papers since I put my kit together.  I LOVE how they work together!  Grey and yellow is such a pretty combination.  Since my daughter's picture is pretty nuetral, it made it easy to use a pop of red for the page accent.  Literally, this page took a few minutes to put together once I had the flower made.  Ah..the flower.  I was anxious to try Meridy's flower tutorial from the other day, but don't have any fabric (I'm not a sewer).  (Secret confession: I looked through my daughter's dresses to see if she had any that I could cut up.  LOL  Relax.  She has a closet full and I would never pick a favorite.)  I searched my Clip It Up to see what I could use instead and spun around to alot of ribbon that I picked up at a rummage sale this past summer.  Hmmm....lace.  I can use that.  So I found a tutorial online on making flowers out of lace and was pretty happy with how it turned out. I put a courderoy brad in the middle for a bit of texture. I love how it mimics the flower in her hair. 


Hop on over to my blog (Double Dog Dare You) if you want to read more about the lace flowers.  Don't forget to link up YOUR take on the challenge on the original post or our facebook!  I can't wait to see what you make!


Thursday, January 13, 2011

Mini Challenge: Back to School!

Our first mini-challenge is going to be a fun one!  I am one of those geeks who LOVED school!  I would be a professional student if I could.  That also translates itself into my crafting!  I enjoy taking classes both in a LSS and online to learn new techniques and challenge myself. 

Going back to college can be pricey, but taking scrapbook classes is not at all!  There are so many great on-line classes you can take for little or no money at all!  We are going to focus this challenge on the free ones!


Mini Challenge: Class options for this challenge are free classes offered right now by 2 Peas:
Scrapbook Stamping with Nicole Magouirk


Products You Love Every Which Way with Shannon Tidwell


For this challenge:  Choose one of these classes and watch the video or look at the downloadable PDF handout.  Then use your kit to participate in the challenge!  Yep.  It is that easy!  And the best part is if you upload your project to 2 Peas and mark which challenge it is for, you will be entered to win a 2 Peas gift certificate!  Don't forget to go to the bottom of this post and add a link to your creation so we can all be inspired!

Here are some more free or inexpensive classes that you might like to know about!
Stash to Treasure
Big Picture Classes
Jessicasprague Digital Classes (some free)
Debbie Hodge Classes
My Creative Classroom
2 Peas Classes (Pay)
2 Peas Classes (Free)
Shimelle (Archived/Self Paced Class)

If you know of any other on-line classes, please post a link in the comments section and I will add them to our list!

Wednesday, January 12, 2011

Do-it-Yourself Stick Pins

There are two green stick pins in the Inspiration Kit...so we decided to link our favorite tutorials for creating your own beaded stick pins.


http://littlebirdiesecrets.blogspot.com/2010/04/hat-pin-or-scrapbook-stick-pin-tutorial.html

http://hannahlaura.com/?p=72

http://jenniferlynne-acraftblog.blogspot.com/2010/07/tutorial-tuesday-straight-pin-accents.html

http://www.papercraftsconnection.com/blog/2010/04/14/groovin%E2%80%99-with-the-go-to-gals-diy-stickpins/

http://www.youtube.com/watch?v=saFBxGcq_I8&playnext=1&list=PL68F7D54C516259DC&index=4

One more tip...if you have the straight pins with an ivory or white ball on the end, you can easily re-color them with a tiny drop of Alcohol Ink or color them with a Copic Marker.  The beaded stick pins are very easy to make, and are the perfect addition to a scrapbook page or card.  Have fun!!!

Tuesday, January 11, 2011

Counterfeit "Sassafrass Vintage Brooches" Tutorial

We have come up with a way to create "faux" vintage brooches using our existing supplies. 


Sassafrass Vintage Brooches
 The very simple process is...

1. Choose some paper or silk flowers from your existing supplies (or die cut a few).  They will work best if they are a few different sizes.  You will only need two or three layers for each "faux brooch".  But you can use as many layers as you would like.
2. Using a glue stick, cover the surface with glue.
3. Sprinkle UTEE (Ultra Thick Embossing Enamel) over the flowers. 
4. Using a heat embossing gun, melt the UTEE. (You may need to apply a few layers.)
4. When the flowers are still warm, you can "reshape" each petal to add a little dimension.
5. Attach the various layers together with a brad.

*CAUTION:  These get VERY hot when you are making them, you will probably want to hold them with a pair of tweezers until they are cool enough to touch.


"Faux" Brooches made with silk flowers.

"Faux" brooches made with paper die cuts.
The nice thing about the "faux" brooches is that they can lay nicely on a scrapbook page, without being too lumpy or dimentional.

Monday, January 10, 2011

Counterfeit "Maya Road Satin Posies" Tutorial

These adorable "satin posies" are part of the Inspiration Add-On kit.
Meridy has created a tutorial for recreating these little flowers on her "Something Scrappy" Blog.

Sunday, January 9, 2011

Counterfeit "Maya Road Transparency Doily" Tutorial

We have done some research, and found a fun and simple way to counterfeit Maya Road's Transparency Doilies. 
Betsy Veldman put up a great tutorial for creating doilies (using stamps) on her blog called Paper, Scissors, Superheros.  You can view the blog post here, it is called "Build a Doily"

Meridy's "Build a Doily" on transparency paper.

To make your doilies look more like the Maya Road ones, rather than creating doilies with colored ink, as Betsy shows us in her tutorial, use Black Staz-On Ink and stamp them on recycled acetate packaging or a transparency sheet.  And there you have it...WARNING: you can get addicted to making these little pretties!!!

Another option is to cut a doily using you Cricut, Silhouette, or other die cutting machine.  Or grab a real small doily and ink it to be any color you would like.  Both alternatives are very simple and quick!

Saturday, January 8, 2011

Vintage Ephemera and Printable Vintage Bingo Cards

In order to find some vintage images for some of the "ephemera" used in my Inspiration Add-On Kit, I took advantage of the Internet and my printer!!!  To do this yourself, try doing a "Google Image" search for vintage advertisements, vintage postcards, or vintage ephemera.  You will get 1000's of results... simply right click on the image you like, save the picture to your computer, re-size it (if necessary) and print it onto cardstock! 

The EXACT bingo cards I printed (on white cardstock) are taken from a Flickr album created by Joy (autumnsensation).  She has generously shared a variety of vintage photos.  You can download the image by clicking on the link below...

http://www.flickr.com/photos/autumnsensation/5178471129/in/set-72157622411170510/

You might want to check out her whole "vintage image" free album...it's pretty cool!!!

One of our fellow "Counterfeiters" has also designed a set of free printable Bingo cards with the months of the year on them.  You can visit her blog and download them from this link http://makelemonadelife.blogspot.com/2011/01/counterfeit-kit-challenge.html  Thank you, Erin!!!

Have fun searching for some great images!

Friday, January 7, 2011

Counterfeit "Studio Calico Notions" Tutorial

Bethany has designed a tutorial for re-creating the Studio Calico Notions in the Inspiration Kit.

See Bethany's step by step tutorial on her blog at http://inspiredscrapper-bethany.blogspot.com/2011/01/studio-calico-notions-tutorial.html .  Enjoy!!!

Thursday, January 6, 2011

Bethany and Meridy's Counterfeit Kits

Now that you have had one whole day to admire the JBSmercantile December 2010 kit and the Add-On Kit...it's time for us to unveil our Counterfeit Kits...

Bethany's Counterfeit Kit

Oh, my goodness, I am in love with this kit!  I have a pretty eclectic collection, but decided to not stress about matching the papers exactly.  I want to go for the "feel" of the kit.  I think that will help me create a kit that I love and that will work for me.  Plus, then I don't have to buy anything.  :)  Everything in my kit is from my collection or handmade for my kit.

Bethany's Counterfeit Kit


I think the first thing that captured me about this kit is the reds and the yellows.  I LOVE that combination... especially when the yellows are from a very soft color pallet.  The alphabet paper struck me as an interesting choice as well, so I wanted to incorporate that, too.  (And, luckily, I had a sheet!  If not, I would have printed out an 8 1/2 x 11 one that I made myself)  I really worked at going out of my comfort zone with the patterned paper choices and staying pretty neutral with the cardstock.  These are not papers I normally would have put together, but the kit inspired me to think outside of the box.   


Bethany's Paper Choices


For my embellishments, I really tried to stretch myself.  I generally don't make a lot of my own embellishments (although I do have a Cricut, I don't get too fancy), so this was really fun to figure out to how to replicate some of the items in the kit.  The journaling labels inspired me by the color, but I like to write, so I stamped in complementary colors with a Notes Stamp to give myself a bit more space to write.  The Bingo cards I made up on the computer pretty quickly.  I'm not sure I got the sizing right, but I did copy the number format that she used.  You MIGHT (hint, hint) be seeing some tutorials in the very near future for both sets of the flowers, but don't tell Meridy that I told.  Shhhh....


Bethany's Embellishments

 
Items in Bethany's kit:
Papers from: Little Yellow Bicycle, Jillibean Soup, Recollections, The Paper Studio, Jenni Bowlin and Bazzil
Letters/journaling: Thickers, Tiny Type (by Cosmo Cricket), Note stamp by We R Memory Keepers
Embellishments: Handmade Flowers, ghost flowers by Heidi Swapp, "doilies" cut on my Cricut, Yellow Sassy Strands (Close to My Heart), pins (Memory Makers), Bingo Cards (homemade)
  
Meridy's Counterfeit Kit

I liked everything about this kit...so much that I tried to match my Counterfeit Kit "piece for piece" to the Inspiration Kit.  I didn't have to spend any money on any supplies for my Counterfeit Kit...it all came from my own supply stash, with the exception of a few things I downloaded (for free) and printed on the computer (like the green bingo card and postcard).   I also made most of the embellishments by hand...we will post the links to tutorials for creating these embellishments throughout the month.  I also added a small metal (empty) cigar box, which I intend on turning into a mini album using this kit.  Enjoy!


Meridy's Counterfeit Kit


Meridy's Counterfeit Add-On Kit


I wish I could give you a list of the various supplies and paper lines I used for my kit...but I take EVERYTHING out of it's package when I buy it...so I don't know what items came from where!  I can tell you that almost all of my patterned paper came from various paper packs/stacks, most of which were purchased at Michael's or JoAnn's.

Now it's time for you to share pictures of your Counterfeit Kits!!!  There are two options, you can either post a picture on our Facebook Page, or through the Mister Linky below.  We can't wait to see what you create!!!


Wednesday, January 5, 2011

January 2011 Counterfeit Inspiration Kit

This month we are using a "previous" kit (from December 2010) rather than a "current" kit (from January 2011). Since this is our first try at organizing the Counterfeit Kit Challenge, we decided to use a "previous" kit to make sure we had enough time to plan things out, work out any kinks, and be confident in our postings. Next month we will use a "current" kit (from February 2011), we PROMISE!

 … So, without further ado… the January 2011 Club Kit for this month's inspiration is put together by Jenni Bowlin Studios at JBSMercantile.com...

The link to the picture and list of contents of the Main Kit is...
http://www.jbsmercantile.com/eco/store.asp?SID=1&Item=988

The link to the picture and list of contents of the Add-On Kit is...
http://www.jbsmercantile.com/eco/store.asp?SID=1&Item=989

ETA - May 2011 Photos of the Main and Add on Kits

Main Kit
Add-On Kit

OK .. now what???

The CHALLENGE is to use this kit for inspiration. How, you ask? Well, there are many ways to go about this. Here are a few ideas...
  • Try and match every piece in this kit as close as possible to something from your supply stash.
  • Use the list of "kit contents" as inspiration, and recreate your own kit with the same types of supplies, but in a different color or style that corresponds better with your preferences/photographs/scrapbook style/tastes.
  • Make a "page kit" rather than a large kit..."counterfeiting" just a few items from this kit as inspiration.
  • Using the color scheme from this kit as inspiration, try to re-create a kit of your own using whatever supplies you have available.

One possible color scheme inspired by this kit.

What's the next step?...Tomorrow we will post pictures of the inspired Counterfeit Kits we put together from our stash of supplies.  We will also provide a link so you can share pictures of your Counterfeit Kits with each other. 

Over the next few days, we will add links to tutorials for counterfeiting many of the embellishments in this kit.

Over the next month, we will post mini challenges to USE your new kit, as well as organize a blog hop to share your creations! 

We hope you all find some inspiration in the kit we choose this month!!!  If you aren't sure where to begin, check out the "Hints and Tips" page of our blog for some help.  Feel free to leave a comment, questions, or any suggestions!!!  We look forward to hearing from you.

Sunday, January 2, 2011

Ringing in the New Year with a great offer!

Happy New Year! I hope you are looking foward to all of the things to come in 2011!  It is a blank canvas just waiting for you to create on it!  If you have not done so yet, you need to check out Ali Edwards One Little Word challenge.  Choose a word that reflects who you are or who you want to be in 2011.  You can check it out here: One Little Word .  My word for 2011 is Persepective!  I think it will be a great challenge to me over the next year to change the way I see things!  I can't wait to grow in this area!  What is YOUR word going to be?  Don't forget to scrapbook it, too!  I will be sharing my layout here very soon!

I got a great offer in my e-mail and thought I would share it with you!  It expires January 9th, but is a great way for you to start off the year right with lots of photos to scrap! 
Snapfish is having a great deal on Penny Prints!  Here is the code:  Just use code 2011PENNY at checkout by 11:59PM PST on January 9.*

Enjoy!  Don't forget to check back on the 5th when we reveal our first Kit to copy!  I'm completely in love with it and can't wait to show you what I put together!

*Beth

Saturday, January 1, 2011

Grab Our Blinkie

Thanks for grabbing our blinkie. To easily add our blinkie (with a link to our blog) to your blog follow these insturctions...
1.  Sign into your blog and select "Design" .
2.  Then select "Add A Gadget".
3.  Click on the "Add HTML/JavaScript" option.
4.  Copy and paste the following code* in the "Content" field:

<a href="http://www.counterfeitkitchallenge.blogspot.com/" target="_blank"><img border="0" alt="Photobucket" src="http://i117.photobucket.com/albums/o69/meridy77/CKblinkie.gif" /></a>

5.  Click on "Save"....it's that easy!


*If you would rather have the "non-blinking" version...copy and paste this code instead:

<a href="http://www.counterfeitkitchallenge.blogspot.com/" target="_blank"><img border="0" alt="Photobucket" src="http://i117.photobucket.com/albums/o69/meridy77/CKblinkie2.jpg" /></a>