We're back today to give you an idea or two of how to make your own embellishments or elements for your own kit!
Let's just have a quick look again at our inspiration kit this month:
 |
| Pink and Paper Subscription Club - June kit |
This feature is all about the fun of having a go at making up your own embellishments or re-creating the papers as a way of getting the same look as the inspiration kit even if you don't have any of the original items.
These tutorials are often so simple and easy that it really is a perfect chance to try out an idea or two. Make sure you share if you do, we love it when are motivated to give it a go!
So talented, so resourceful, so inspirational!
Master Forger Misty went wild again this month with forgeries as she just couldn't decide which one she liked best. So here are two paper and two embellishment forgeries for you based on these products...
Scalloped Pattern Paper
Punch circles out of cardstock. Cut in Half. Trace evenly spaced lines on white cardstock in pencil.
Add a thin stripe of liquid glue along the line. Glue circles in place.
Bonus: fluff up circles for a very textural background layer
(see 2nd row of some fluffed circles!)
Puffy Word Stickers
Use dimensional drops, like Nuvo brand, to draw on a piece of scrap plastic. Allow to dry 24-28 hours. Peel from plastic and use as "stickers". (A bit of a tip... the longer they dry, the less they will stick to each other when you store them. I try not to let them touch during storage to further prevent this problem.)
Create Real Tassel Banners
While the inspiration was from these paper diecut images, I could not resist creating real, little tassels for a sweet banner. So dang cute.
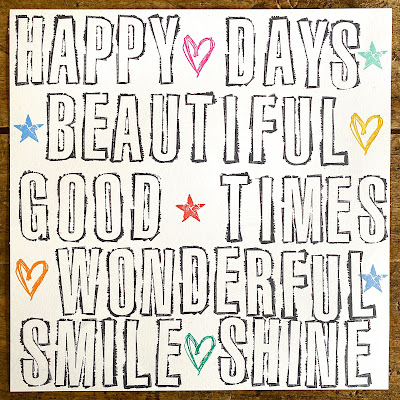
Get Wordy
A few tips can help you create your own word art paper (even if you don't like your handwriting!!).
** Start by lightly spacing straight lines on your white cardstock with a pencil & ruler. I made mine 2" apart. Bigger words = faster project!!
** Use capital letters to write in your words first. Draw letter from upper line to lower line, almost, but not quite touching each line.
** THEN outline each line stroke with a rectangle in pen. Don't be afraid to overlap your lines for that playful word art look.
** Have fun doodling little image dividers between words for more playfulness.
MF Lisa here and always, Pinterest was my first go-to again this month where I found some cute links to the following:
- Pizzazzerie has a great tutorial for making your own tissue paper tassels - I guess you could mini them down for a page size and they would be so cute!
- Undercover Classroom has a great how-to for yarn tassels too so that's another option. Downsize them to page size and you could even mix and match the yarn and tissue paper for an eclectic look!
Tutorial here: https://www.undercoverclassroom.com/yarn-tassel-garland-diy/
- The die cut packs have some fantastic motifs which could be replicated using print and cut if you have an electronic die-cutting machine or just print and fussy cut if you don't but the super cute rosettes in the Happy Days pack caught my eye and found this tutorial by Creative Findings to make rosette wands - without the "wand", they would be a fantastic dimensional embellishment for your page or a greetings card.
- And what about these gorgeous mini rosette embellishments made by Connie Craig and found on Scrapbook.com here
- Natasha Foote on YouTube shares how she makes "faux" enamel dot hearts with such a simple method using Nuvo Drops

Master Forger Cindy also created scalloped banners. She punched the circles from scrap paper, glued them to another strip of paper. The white medium white banners are from a scalloped circle. the yellow is a 2" circle and then I found a Stampin' Up scallop border punch.
I plan on coloring the white ones when I add to my layout.
Thinking outside the box - not a circle punch - I pulled out a few more scraps of paper and the Stampin' Up Curly label punch. Punched a few of the labels and lined them up on a piece of cardstock to make my scallop.
I added this to a card front.
Master Forger Leslie got a little grungy with her rogue kit:
and these fussy-cut heat embossed take on the puffy words:
Here is what the rest of the month of August's inspiration will look like:
- 6th August - Mini Kit Reveal and Project Showcase - Inspiration for a smaller kit or project ideas.
- 12th August- Challenge #1 - To inspire you to get creating from your own kit.
- 18th August - Challenge #2 - To inspire you to get creating from your own kit.
- 24th August - Follower's Showcase - who has caught our eye this month.
- 31st August - Killing the Kit - an idea or two focusing on using up the bits and pieces left in your kit.
You know that we always love to see your work, so please share your kits and projects with us. You can post them in our Facebook Community or share them on Instagram (we are @counterfeitkitchallenge or tag us using #counterfeitkitchallenge and #ckcaugust2023).


No comments:
Post a Comment
Compliance with the new European Union E-Privacy Regulation
If you leave a comment on this blog, you do so with the knowledge that your name and blog link are visible to all who visit this blog, that you have published your own personal details and that you have consented for your personal information to be displayed.
This blog is currently generated from the USA with contributors from Europe, Australia and the USA.