
Sherri's "Babbling Brook" Counterfeit Kit

This kit was the most challenging for me because I needed to make three of the papers and the scalloped die cut. My Cricut, punches and stamps got a workout with this kit! I included a punched flower border and a small bubble stamp, plus DIY pockets that I made from one sheet of die-cut ledger paper. for more details, go to my blog http://sherrithompson.blogspot.com/2011/03/my-counterfeit-babbling-brook-kit.html.
Meridy's "Babbling Brook" Counterfeit Kit

I decided to get "close" to the main kit...but substituted what I had to "make it work". I had fun putting this one together.
Bethany's "Babbling Brook" Counterfeit Kit

These papers surprised me. I think I was expecting more of a woodsy feel from this kit. I had fun re-creating the papers I couldn't match well and think this is a good more masculine addition for me this month. Check out my BLOG for a complete list of my kit contents and more pictures.
I recreated 3 of the papers from this kit (THREE!!! I'm so proud of me!).
Dot Paper Tutorial:
Here is the original paper:

And here is what I did:
As soon as I saw the dot paper in Babbling Brook I knew I wanted to re-create it. I went through all of my scrap paper and started pulling any paper that would work well with the other paper in this kit. I used my Cricut to cut out 2 (1 inch) circles from each paper so I could grid them out and see how many total dots I would need.

I used my Xyron to put adhesive on the dots...they are curling up a bit, so I will need to use my ATG to fix some of them. I did a row across and a row down to get my random pattern started and see how many dots I still needed to cut.

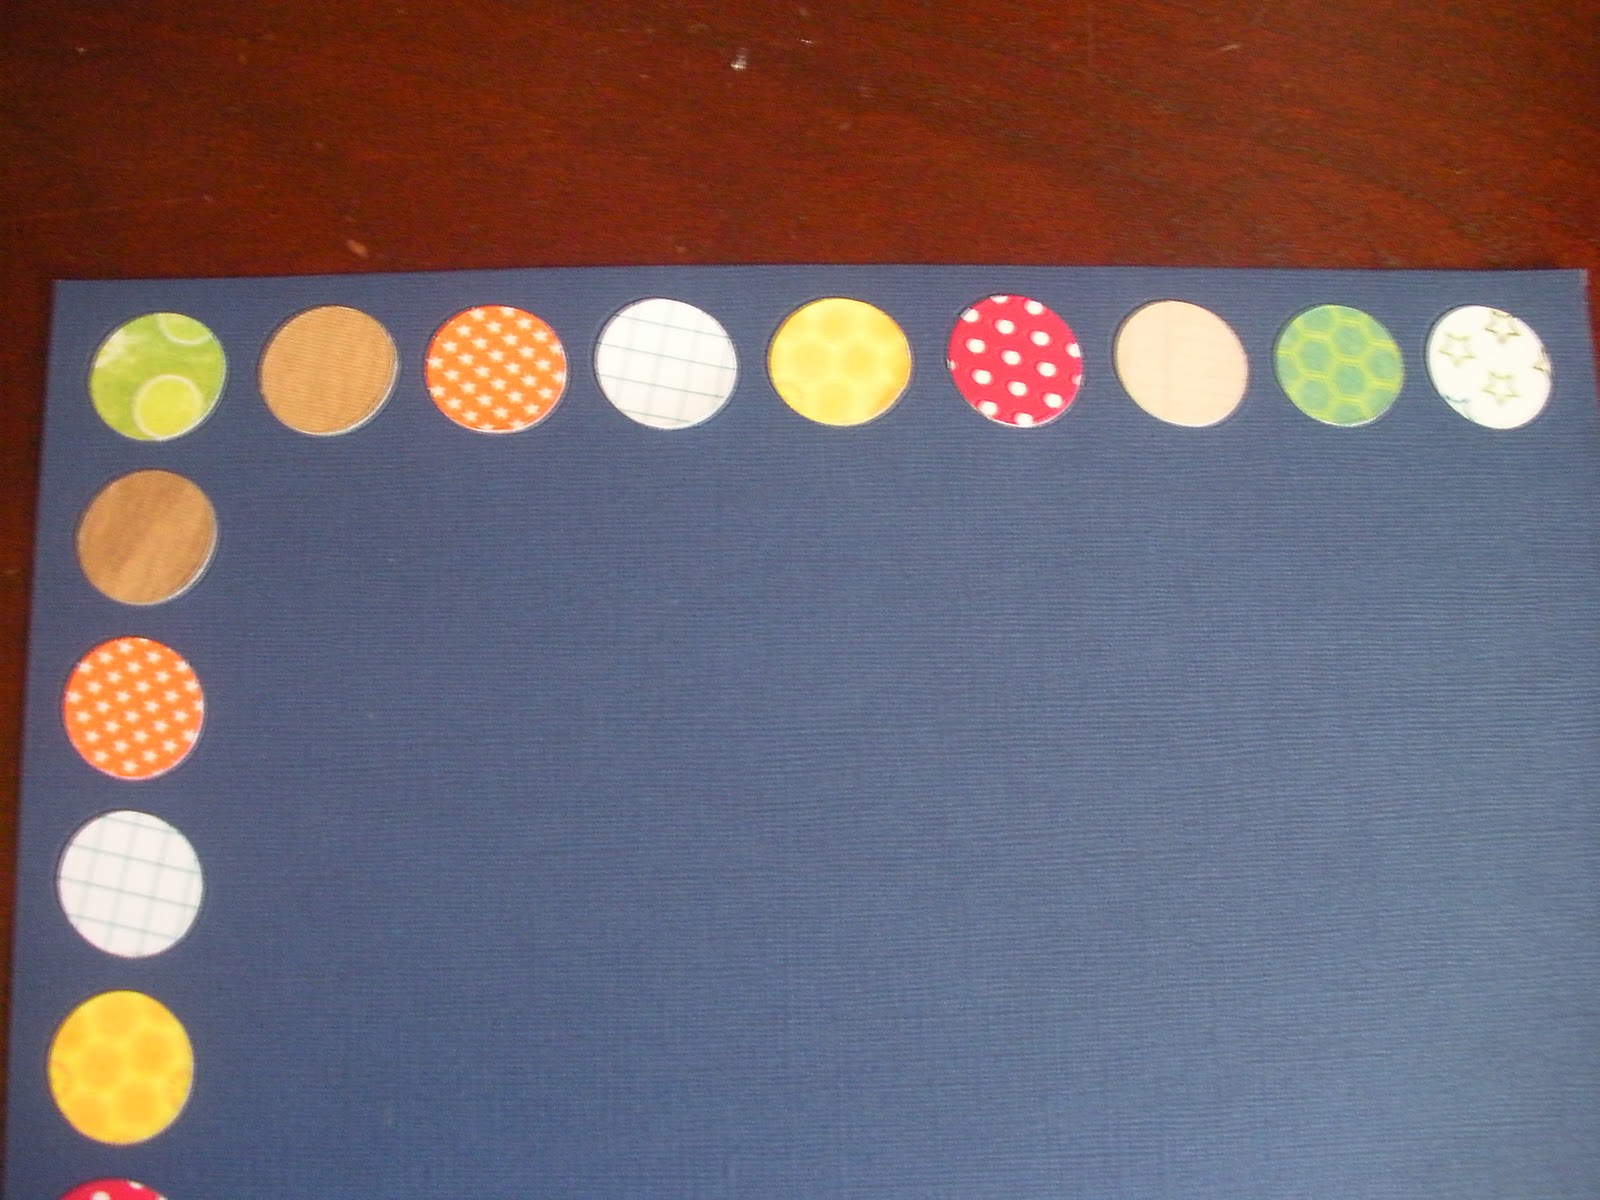
I am notorious for doing things crooked (yep, I can even cut crooked paper on my paper trimmer! LOL), so I used a ruler to help me keep the rows fairly straight. I not really good at doing things randomly. No matter how hard I try, things seem to go in a natural order for me, so I really worked at picking a top row dot and completing the sequence after that dot. For the next row, I would move down a few dots in the first row and finish the sequence from there.

Other than slight curling with some of the dots, I am thrilled with how the paper looks and will definitely try it again! I love that it has bits of other papers from the kit. It is a great way to personalize it. And using up my scraps is always a plus, too.

Sherri also made a tutorial for this paper, you can check it out at her blog http://sherrithompson.blogspot.com/2011/03/get-look-cosmo-crickets-cocktail.html
Alphabet Paper Tutorial:
Here is the original paper:

And here is how I recreated it:
I loved the tonal look that it has, so I contemplated using my Cricut, but ended up stamping instead just for something different.

All I needed was an alpha stamp set, colored cardstock and matching ink (I used a slightly darker color...you could use Versamark if you want a more subtle look)

I stamped in small sections so I could work on making it feel more random. Changing the direction of the stamp and stamping partially off the page helps with that, too.

Round Scalloped Paper Tutorial:

This paper was pretty easy to create using my Cricut. I used the Storybook Cartridge for the scallops, (but you could use punched out circles) and the circle. I added faux stitching to mimic the red line on the original paper. I could have glittered the scallops, but didn't really want to. LOL How is that for a reason?

Here are some more links you might like about making your own paper:
Random Stamping
CTMH TV
Making paper from a napkin
Awesome job! I made the abc paper and the circle punch paper too!
ReplyDeleteI love it. I was going to make the Alphabet paper too so woohooo! I will be doing it slightly different using chipboard letter leftovers though! YAY!
ReplyDeleteHere is an option that gives you the ability to use a scallop punch or drawn scallop shaped border on a circle:
ReplyDeletehttp://myscrapbookevolution.blogspot.com/2010/09/scrap-our-stash-border-challenge-take.html
Great ideas! I especially love how the circle paper turned out!
ReplyDeleteWhat an awesome idea! I never would have thought to do that circle paper like you did! You may have just created a monster with my cricut!
ReplyDeleteMichelle
Great tutorials! I love that polka dot paper - random or not. I really like how the circle paper turned out. Going to have to try these at home.
ReplyDeleteWow, Bethany, these background papers are incredible. Nice job.
ReplyDeleteTFS
Ang
Marilyn said...
ReplyDeleteThat alphabet paper was not like anything I had in my stash, and since I am trying to duplicate the kits as closely as possible it was really bothering me. But now......I can MAKE the paper! I have plenty of tonal paper in the right color and a Cricut- off to cut letters!
I love how you ladies created paper of your own to match the inspiration kit! My favorite is the big dotted paper, and I intend on trying this to create my own!
ReplyDeleteLadies, your kits are truly fantastic. Thank you so much for all of the inspiration!
ReplyDeleteGreat ideas! I like how you made what you needed!
ReplyDeleteSome brilliant ideas - thank you for sharing.
ReplyDeleteLOVE the dot paper tutorial -- thanks for the inspiration :)
ReplyDeleteGreat to see what you all put together.
ReplyDeletelove these examples! i'm soooo going to try the dot paper!
ReplyDeleteI love the different takes on the same add on. The dot paper tutorial is such a good idea- I would never have thought to do it on my own!
ReplyDeleteWow, lots of work went into making your papers. I just found papers that had the same feel and went with them. I never thought to do more, its great to keep this in mind.
ReplyDeleteThanks for the great ideas of making your own papers-what an awesome way to use scraps!
ReplyDelete