Master Forger Ryann here with the first challenge of the month. But first let's take a quick look at our Inspiration kit.
Scrapbook pages are our way of expressing our creativity while telling the story. Some of us like depth, some like flat, some like textures and stitching. I want you to take a few minutes and create something that makes a little noise! Here in the states, July means fireworks - which is loud and celebratory!
So I want you to add a Shaker Box to your layout! Whether you are accentuating the BOOM from a firework, bugs in a Mason jar, or it's the crackling flames of your campfire, add some sound to your layout! Shake! Shake! Shake! Make one, or use one you already have in your stash. If you know how to make one, let’s see your own take on them!
Basics on making your own shaker box:
1. Use a cut file and cover the backside with plastic - I used some packaging material.
2. Outline the cut file with foam tape. Make sure there are no gaps for the filling to sneak out! (I DID leave a little space between stars so the fill could move between the two - but not around the edges!)
3. Fill with small bling, confetti, beads, buttons, or whatever else fits inside and goes with your idea. (If any items have an "up" side, make sure you have the "up" side facing the window) (You can see one of my bling pieces flipped over!)
4. Fully adhere the backing to the shaker - again, making sure nothing can sneak out!
To help you get started, let's check out what our Master Forgers came up with for this challenge.
Guest Designer Lacy Stockton shared this layout. Her title includes letters made from slide mounts shakers. She says, "I haven't made a shaker in a long while but recently my youngest son asked me to make more of my scrapbook layouts interactive. Sometimes adding something that is interactive takes a lot of effort but, with a bit of time, shaker boxes are pretty simple to make and can add a special look to a layout. The layout I added my shaker title too was about a modern, simple look to add to the artsy theme of my kids sitting on a large hand chair after lunch. I didn't have embellishments, in mind, that would add focus so I thought the shakers would enhance the layout and still allow the photos to be a focus.""

Her shaker box steps were similar to the ones above. Because some people use foam tape, foam sheets, or foam squares, like hers, it's a really versatile technique!
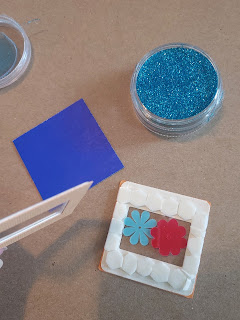
Pieces and elements - slide mounts, colored slide covers, foam dimensions, glitter, and flower fillers.
Clear plastic that she cut to size.
.jpeg)
The process of filling the boxes and putting the back onto the box.
Covering the front with the colored slide cover.
Adding the letters to the center of each window and finishing the layout with this amazing Shaker Box Title!
Master Forger Jody
@floppyearedfarm used the entire cut file as a shaker element! Go big or go home right?!
It does not matter the size of the shaker all the elements are the same. Use something clear, (packaging,
acetate) and adhesive foam tape to create your well, fill up your well with all the sparkly goodness then
close your well tightly!
Give it a good shake to hear and see your beautiful creation!
A process video was created to share each step, check it out here!
Master Forger JoJo
I stamped out the jar and fireflies and fussy cut them out, and use 3D tape to adhere the jar
and put 3 fireflies and a little bit of glitter to make this tiny shaker box to match my handmade
paper. I documented our family's last time enjoying the fire pit at my parents home. I love
handmade little details to personalize your page.
Master Forger Cindy
I used a circle punch to make my shaker boxes out of red, blue and yellow cardstock. I cut down my cardstock approximate 3 inches and punched out the circle. I used foam tape around the circle and around the squares.
Now go create your layout. Be sure to come back for more challenges. This is what's up next:
- 18th July - Challenge #2
- 22nd July Challenge #3 Let's Get Sketchy
- 24th July- Follower Showcase
- 28th July - August Sneak Peek (on Instagram and the Facebook Community)
- 30th July - Challenge #4 Baby Use Those Scraps
We really love to hear from our followers! Make sure you visit us on the Facebook Community Group. You can also visit us on Instagram by tagging #counterfeitkitchallenge and #ckcJuly2024.
Remember to make every day a Day Worth Scrapbooking!
~Ryann
See you soon!


.jpeg)
.jpeg)
.jpeg)


No comments:
Post a Comment
Compliance with the new European Union E-Privacy Regulation
If you leave a comment on this blog, you do so with the knowledge that your name and blog link are visible to all who visit this blog, that you have published your own personal details and that you have consented for your personal information to be displayed.
This blog is currently generated from the USA with contributors from Europe, Australia and the USA.