Monday, February 28, 2011

February Blog Hop!


It is blog hop day and we are ready to roll!  This blog hop is featuring this sketchy goodness from Scraps of Darkness:


Wait until you see what all of our Counterfeiters came up with!  Before we get to hopping, we want to give a shout out to SCRAPS OF DARKNESS for sponsoring this month!  I hope you visit her site often to check out the great kits she pulls together.  And if you decide to splurge on one (or more), I promise not to tell.  The cut off for posting to our Master Mr. Linky to be entered into a drawing for one of her fantastic kits is midnight tonight, so make sure you post your links to your KIT and whatever you have made from your kit this month!

Let the hopping begin!  I hope you have some good tennis shoes on because we have a whopping total of  30 blogs to hop to today!  We love how many of you are participating with us!  Rock on, Counterfeiters!   Here is a list of all of the blogs on our hop (just in case you get a bit lost along the way):

Meridy
Gabrielle

Karen
Susanne
Michelle
Kylie
Lori
Milissa
Angela H.
Angela
Tricia
Kim
Christy
Melissa
Sherri
Marianne
Jemma
Denise
Debbie
Missus Wookie
Stacey
Glinda
Laurie
Margie
Marlynn
Dawn
Debbie
Crystal
Bethany
Ruth

BTW: we are hoping to see some pics of the leftovers from your kit to see how much you used up...be on the lookout for a post about that!

Sunday, February 27, 2011

Cute idea for Easter anyone?

I know...I know...pink and red is not really an Easter Combination.  Now close your eyes and see some pretty pastels...or black and white.  This Valentine's Day project from Heidi Swapp could cover almost any holiday or birthday event!  How cute is this?

(Photo was snagged from Heidi's blog)

I LOVE these!  I might just make them for no reason at all!  Tutorial for this cute candy goodness can be found here:  The One Thing

Who is going to make me one?  Pretty please?

Saturday, February 26, 2011

Fun mini book tutorial!

Oh, my great goodness!  I have been enjoying browsing some incredible blogs lately and bookmarking SO many projects that I want to do!  LOL  Don't you love it when inspiration is in a race with motherly duties for your creative time?


 I wonder who will win?  LOL

I found THIS adorable project on Poppy Paperie :  (I snagged this photo off of her site, but you will need to go there to get the full tutorial.)


I'm thinking I now know what to do with my leftover bits of paper from my kit!  You will not be sorry if you check out the rest of her blog.  I "heart" her!  She is incredibly talented!  Have fun playing!

**Stop by my blog to see the mini album I made from this tutorial!  I love it!  Double Dog Dare You

Friday, February 25, 2011

Perfect Timing!

Oh, girls (I'm pretty sure we are all female on here).....look at what I found!

Moxie Fab paper piecing contest

Isn't this perfect!  Go there and upload any paper piecing projects and you will be entered to win a prize from them!  LOL  I love it when things just happen to work out like this!

Reminder:  Today is the last day to sign up for the blog hop.  I am pretty strict about the cutoff to ensure that the participants have plenty of time to get their post ready.  Shoot me an e-mail if you want to participate with your Scraps of Darkness sketch layout.  We have a good turnout this month, but ALWAYS have room for one more!

Thursday, February 24, 2011

Gabrielle's Paper Piecing Mini Challenge: Don't go breakin' my heart

When I think of paper piecing, I am automatically reminded of those adorable little tear bears from years ago.  Although I admire the detail and effort that went into those little creations, "cutesy" is not my style at all!

Then, I remembered seeing a project by one of the BG designers on Scrapbook Memories TV show, which was a very cool mosaic picture frame made from heat embossed paper scraps.  I thought I could adapt that idea for my Valentine card project.

Basically, I cut up little bits of paper from all of the papers in my kit.  This is an awesome way to use up little scraps of paper!  I glued them onto a cardstock base, with a glue stick.  Then, I cut out the heart using a template.  I heat embossed the heart by stamping over the entire thing with a Versamark pad, and layering clear embossing powder, heating between each layer.  Eventually, the embossing will resemble ceramic tile!  I adhered my embossed heart to a black mat, and glued it to my card.

As I was working on this, I kept thinking of the song lyrics "Don't go breakin' my heart...", and thought that would make a great sentiment for my card.  I'm not sure who I would send it to, but it's always good to have cards on hand for any occasion.


All of the items came from my February Counterfeit kit, except for the ribbon rosette, which was left over from my January kit.  Please check out my blog to see all of the other projects I made with my kit.  It has been so much fun looking at all of the other kits and projects!

Gabrielle

Wednesday, February 23, 2011

Layout: "Love Notes" (Paper Piecing Mini Challenge)


I decided to do some simple piano keys as the paper piecing for this mini challenge.  I like the way it turned out and I really liked the play on words for the title...I just happened to have the little "love notes" journaling block in my kit...I thought it worked so perfectly with these pictures, that I had to repeat the sentiment as a title!  Everything on my layout came from my counterfeit kit except the tiny scrap of vintage sheet music and the red cardstock.

Tuesday, February 22, 2011

Our Family Layout for Mini Challenge: Paper Piecing

I had alot of fun making this layout using paper piecing!  Pretty much anything goes for this challenge.  Use your die cut machine to layer paper--punches to create new shapes-- stamp on multiple papers and cut them out and put back together like a puzzle--get back to basics with your scissors and create a personal embellishment. 

I decided to play with punches for this challenge and created this layout about my brother and his family:


The flowers are punched out and layered using 3 different punches (the pink punch is actually the punch you use for the I-Top to make paper covered brads):


I cut out some paper with the I-Top brad punch first:


Then I used my big flower punch to punch out the middle of the first punch:


I took another scrap and cut out a tiny flower:


I simply layered them all together to make a different flower:


Here it is on my layout.  My paper was double sided, so that helped add interest.  I also added some bling to the middle and a butterfly cut out with my Cricut (Lyrical Letters) and raised up with a foam square.


I can't wait to see what YOU came up with!  If you go to my blog (Double Dog Dare You) you will see some bonus paper piecing projecst that I made (shhh....didn't use my kit for one of the cards...don't tell Meridy!)

Blog Hop Reminder!  Get your e-mails to us by the 25th to participate in the blog hop (to show off our projects from the Scraps Of Darkness Sketch)!  We had great participation last time...I hope we have even MORE this time!

Monday, February 21, 2011

Mini Challenge: Paper Piecing

Did you see the the cute little tutorial in Scrapbooks Ect. this month for a puppy made out of some hearts and circles?  It would be so sweet on a kid's Valentine.  I love to paper piece, but don't often take the time to do it anymore.  There is a certain satisfaction out of making things yourself, though, that pre-made embellishements just can't quite muster.  Here are a few of my projects that I have used paper piecing on:


I am very fortunate to own *cough* several electronic die cutting machines (my husbands big gift giving idea), so that does make it easier.  I still enjoy getting out my punches or scissors and seeing what I can create, though. 

Mini Challenge:
Paper piece something to use on a layout, card or project made with your kit.  You can use a die cut machine, punches or even just scissors.  Don't forget to post it to our Mr. Linky so you can be entered to win a great Scrapbook Kit from Scraps of Darkness!

Paper Piecing Inspiration:
Flower Bug
Scrapbooks Ect. Patterns
Splitcoast Stampers Paper Piecing Tutorial
Basics of Paper Piecing
Great example of using details

Sunday, February 20, 2011

Scraps of Darkness Sketch Teaser and Blog Hop Reminder

Want to see what I created for the blog hop using the Scraps of Darkness sketch?  How about a peek?


If you want to see my whole layout...AND all of the wonderful things that our talented bloggers have created then you will need to wait until the hop!

Don't forget the blog hop is coming up!  You need to e-mail us by the 25th if you want to participate!

Blog Hop Details:
Create your assigned project and take a photo of it


You will have until the 25th to e-mail me at counterfeitkitchallenge@yahoo.com with February Blog Hop.  In your e-mail please give me the link to your blog and be ready to publish a post with the challenge photo on the 28th for the hop.


I will put together a list of all participating blogs and will e-mail everyone the order of the blog hop and how to do their post!


On the 28th (or earlier if you want to schedual it to simply post on the 28th) you will create a blog post that shares your creation and them posts the link to the next blog on the list.  Easy!

Saturday, February 19, 2011

Reminder...Master of Forgery (Design Team) Applications due by March 1st

We want to remind everyone who is interested, to get in your Master of Forgery (aka Design Team) applications.  They are due in 10 days (by March 1st).  We will announce the Masters of Forgery on March 15th.  If you need any further details...here is the original "Design Team Call" post.  Good luck!  We can't wait to hear from you.  

Friday, February 18, 2011

Mini Challenge: Scraps of Darkness Sketch and Blog Hop Details!

It is time for another sketch challenge!  Scraps of Darkness offers a unique sketch every month that anyone can use.  You can find them here: Scraps of Darkness Sketches .  We are going to use this months sketch for our challenge:


How pretty is this! 

Mini Challenge:  Use the above sketch to create a one-page layout, two-page layout or card.  Use the sketch as is or just to inspire you. This is going to be our Blog Hop Challenge so DO NOT POST IT TO MR. LINKY!  If you participate in the Blog Hop, your name will go in the drawing TWO TIMES!


Blog Hop Details:
Create your assigned project and take a photo of it


On the 21st of each month I will remind you of the blog hop.  You will have until the 25th to e-mail me at counterfeitkitchallenge@yahoo.com with February Blog Hop.  In your e-mail please give me the link to your blog and be ready to publish a post with the challenge photo on the 28th for the hop.


I will put together a list of all participating blogs and will e-mail everyone the order of the blog hop and how to do their post!


On the 28th (or earlier if you want to schedual it to simply post on the 28th) you will create a blog post that shares your creation and then posts the link to the next blog on the list.  Easy!

Thursday, February 17, 2011

Layout: "Things That Maddy Knows" (Putting the Pen to Paper Mini Challenge)

I love to journal on my layouts...but it's usually background for the photos.  I have been trying to make the journaling more meaningful in the past few years, I have tried to add specific details, and most importantly, I try to journal about the pictures within a week or two of taking them (so I don't forget anything).

This challenge allowed me to include some of Maddy's "ramblings", that otherwise would have been forgotten.  I was listening to her the other day, and decided that I should write down what she was saying as soon as I could get to a pen and paper...or I would quickly forget the details.  Fast forward 5 days, I read Bethany's "Mini Challenge" and thought these ramblings would be PERFECT for the challenge!

So off I set to create my layout.  Well, I have 2 confessions...

1st, I had to pull out MORE paper to use for this mini challenge.  I have already used up all of my counterfeit kit paper!  In order to complete this challenge, I grabbed some patterned paper (from my stash) that coordinates with the embellishments and scraps that I had left from my Counterfeit Kit. 

2nd, I ALWAYS create double page layouts.  But this mini challenge seemed a little overwhelming to turn into a double page spread...so I made a one page layout!!!  I will place it as either the first or last page of an album...and no, I didn't convert to one page layouts!  I still love my 2-pagers!!! 

Here is my layout which describes "Things That Maddy Knows"--according to her at age 4 1/2.


Please link a picture of your "Putting the Pen to Paper" mini challenge here...  http://counterfeitkitchallenge.blogspot.com/2011/02/mister-linky-for-february-2011.html.  I can't wait to see what you created!

                      *meridy*

Tuesday, February 15, 2011

Layout for Mini Challenge: Putting Pen to Paper

I will admit that this was a HARD challenge for me.  After I scheduled it, I sort of didn't want to do it. LOL  It requires a lot of soul searching and thought to plan a layout like this.  I ran through a list of topics that I thought would make meaningful journaling for me.  There are so many things I still want to document...I really need to do this challenge several times.  Or just write a book.  One of the two.  LOL 

Planning my layout was easy since I had my kit.  I decided to do a layout about our journey to starting this blog.  Using bits and pieces of the entire kit seemed like a great way to do that.  I was intimidated at the thought of a large blank space for journaling on my 12x12 pages, so I thought of ways to minimize it.  I could do a very focused page with a lot of white space and a small cluster of embellishments and journaling.  Or cut out my journaling into strips to maximize their impact on the page.

In my head I kept getting stuck on tags.  I really wanted to do a layout made up of tags.  Why not?  Here is what I came up with:
I was able to use just about everything in my kit.  Here is my journaling:

In January 2010 I started a Make Your Own Kit Challenge on 2 Peas.  Life got in the way and it fizzled out.  Fast forward to November and other pea sent me a message asking about the challenge.  We decided to do it together in January and the Counterfeit Kit Challenge was born.  We soon discovered that Meridy and I were the perfect pair to start this challenge.  We are both go-getters, enthusiastic and organized.  Our idea quickly blossomed into an actual challenge blog and Facebook page.  Our basic concept is to pick a kit from a kit club and copy it using our own supplies.  We post tutorials, challenges and even have an end of the month Blog Hop.  By February our blog has exceeded any expectations.  We have 187 followers and an average of 23,000 page views in just 2 months!  We are starting a Design Team and have had some sponser offers.  This is alot of work, but it is a really great experience.  The best part has been the friendship I have found in Meridy.  She is so talented, creative, tech saavy and generous.  She is a positive force in my life.  I am greatful for this experience.

Head over to my blog (Double Dog Dare You) if you want a few close ups of some of the embellishments and a breakdown of the tags.  I can't wait to see what you create, so don't forget to find the Main Mr. Linky and post there to be entered in our drawing for an awesome Kit from Scraps of Darkness!

Monday, February 14, 2011

Layout: "Our Engagement" (Putting the Pen to Paper Mini Challenge)


"I love the idea for the mini-challenge because journaling is so important, and so often forgotten on our pages! 


Guest Designer,  Gabrielle's, beautiful Mini Challenge Layout
 For the "journaling only" challenge, I knew I wanted to scrap a page about my husband's proposal.  It is one event that I don't really have a photo of, and since it was very romantic, I thought it would go very well with my kit. 

My journaling was so long, and I tried several times to fit it onto my page in an attractive manner.  I originally printed one of the free journaling spots we were given very big, in the hopes of fitting it all in.  It looked funny, but I really liked the artwork on that piece.  So, I used the reverse side of one of my papers (it was lined), and wrote my journaling out on that.  Then, I cut out the flourish pattern from the journaling spot, and adhered it to my journaling block.  I used the Prima backing behind the journaling block, so I could include the rest of my story, which can be read by sliding the card out.

I used water colors and the Shimmerz to color in the floral design, and dotted Liquid Pearls along the flourish for a touch of bling.  I layered many pieces of paper to make the frame for my journaling block.  The alphas I used for my title were ones I had planned on using in my add-on, but had forgotten to include (Fancy Pants Road Show).  Everything else is from the kit.  Thanks for the awesome challenge!"
Gabrielle

Detail of Gabrielle's Layout

Sunday, February 13, 2011

Mini Challenge: Putting Pen to Paper

I have always loved to write.  In my school days, if you asked me my favorite thing to do, I would have said write.  I loved essay questions, research papers and creative writing assignments.  I even wrote a short children's book for a college class.


I come from a family of writers.  My Paternal Grandmother was a teacher and wrote a column for the newspaper...my Grandpop was a journalist, an editor and taught journalism classes.  My Maternal Grandfather was a naturalist who wrote down books full of notes and jewels of insights.  Many of them have been published in a local newspaper.  Writing has been a natural part of my life.  Until I started scrapbooking.  Suddenly I have nothing to say.  I am trying to tell our story and I have no words.  Why is it so hard?  I find myself giving rote information and missing the essence of the story.  Well, no more.  This lover of pencils ( I will admit it.  School supplies make me happy) and maker of lists is getting back to my writing roots with this challenge.  Hopefully it will stick with me and help add soul to the way I create.

Before I tell you the challenge, check out this video:  True Stories  

 Now we are not taking her class...and our challenge will not last so long, but  it will be hard.  I promise you that some of you will just want to skip it.   But it will be oh, so worth it.  It is time to stop hiding behind patterned paper, photos and pretty embellishments.   

Mini Challenge:  Do a layout with NO PICTURES.  Only Journaling.  It can be about anything you want, but focus on using words to tell your story.  And let's get back to basics.  I want this to be a handwritten challenge.  So no computers.  You can use:


Or


I cherish the letters that I have saved from my Grandmother and Susie, a dear friend, who have both passed away.  It is important that we pass that piece of ourselves onto our loved ones.  Because of that, I try to always have my handwriting on layouts.  Do I have the best handwriting in the world?  No.  But my family won't care years from now. 

Link your layout for the "Putting Pen to Paper" Mini Challenge to the Mister Linky for February (found here... http://counterfeitkitchallenge.blogspot.com/2011/02/mister-linky-for-february-2011.html )  to be entered in the random drawing for a FREE Scraps of Darkness Kit from February 2011!

Saturday, February 12, 2011

Make Your Own Glimmer Mist, Glimmer Glam, and Glimmer Glaze!


There are bottles of Glimmer Mist, Glimmer Glaze, Glimmer Glam in this month's Inspiration Kit(s).  We had one question before re-creating our Counterfeit Kits...WHAT'S THE DIFFERENCE???  Since we didn't know the difference, we thought you might not know the difference either...

In the following video the demonstrator explains AND shows the differences beautifully http://vimeo.com/9100809

OK...on to the tutorials!!!

Glimmer Mist Tutorials

Time Holtz has a tutorial for creating Glimmer Mist here  http://www.youtube.com/watch?v=9zm5JTf2Oxs

Here is the recipe I use... 

Glimmer Glam/Glimmer Glaze Tutorials
I'm not srue whether to classify the following tutorials into "Glimmer Glam" or "Glimmer Glaze"...so I just grouped them all together. 

Thicker Glitter Glaze Paint  http://www.youtube.com/watch?v=JjeUvJQtxW8

Home Made "Twinkling H2O Water Color Paint" http://www.youtube.com/watch?v=A0vq6tD2oBA&feature=related

Creating Shimmer Water Color Paints http://www.youtube.com/watch?v=Zep2692JRR4

Glimmer Glam http://www.youtube.com/watch?v=d5AClDAKGF0&feature=player_embedded

Really SIMPLE  http://www.youtube.com/watch?v=toUyfvtmdnE&feature=related

Uses for Glimmer Mist, Glimmer Glam, and Glimmer Glaze
Now that you know how to make the Glimmer Mist, Glimmer Glam, and Glimmer Glaze here are some greate uses for it!

Paint/spray on paper to change the color and add glimmer
Use to paint white embellishments to add color and glimmer (think silk or paper flowers, fabric, chipboard)
Use with stencils or masks
Add color and glimmer to ribbons and lace
Add color and glimmer to a canvas
Use to *stain* wooden embellishments

Friday, February 11, 2011

Do It Yourself Page Pebbles

These BEAUTIFUL Prima Pebbles are included in the Scraps of Darkness inspiration kit.


They are not too hard to recreate either! 

These are thin and "scrapbook" friendly...http://andreawalford.com/stampin-up-tutorial-tuesday-faux-page-pebbles

These are thin as well (minus the magnet on the back)... http://www.deepfriedkudzu.com/2007/06/page-pebble-refrigerator-magnets.html

These are a bit more dimensional (maybe better used on altered projects, as they will not lay very flat on a scrapbook page)...  http://mapleandmagnolia.com/2010/11/26/thrifty-gifty-idea/

Here are some of the page pebbles Bethany made from the 2nd tutorial.  She used patterned paper, a dictionary, graph paper, sheet music, and old Making Memory's Clear Self Adhesive Page Pebbles (remember those???).  When I add them to my project, I will also add some bling around the outside of each one.


Bonus Tutorial:

Another one of our fellow counterfeiters put up 2 great tutorials on her blog as well.  On her blog, Deb's Eclectic Thoughts, Debbie posted a GREAT tutorial for the black Theresa Collins' Blingage as well as another option for mirrored embellishments!  They are both great tutorials!  Thanks, Debbie! Here's the link http://debseclecticthoughts.blogspot.com/2011/02/february-challenge-time.html

Thursday, February 10, 2011

Prima Look-Alike Flower Tutorials

Apparently one can NEVER have too many different styles of flowers!  The following Prima Flowers are included in the Scraps of Darkness Kit and Romance Add-On Kit.


Below are a few great tutorials for re-creating Prima Flowers...
These look fairly similar to the multi colored Prima Roses pictured above http://gabriellepollacco.blogspot.com/2010/08/flower-tutorial-making-water-distressed.html

This is another "Prima Look Alike" tutorial http://www.youtube.com/watch?v=r_hFRymeVfo&feature=related

If you look close, there is a piece of burlap behind the black and white Primas...so here was a cool burlap flower tutorial...they they can be colored with the homemade glimmer glaze!    http://www.youtube.com/watch?v=PSGU1LBegJA


Here are a few of the flowers that we choose to use in our Counterfeit Kits...
Some of Bethany's homemade flowers

Wednesday, February 9, 2011

Rhinestone, Pearl, and Dew Drop Flourish Tutorials

There is an elegant self-adhesive pearl flourish in the Inspiration Kit by Zva Creative...


Similar Pearl Flourish by Zva Creative

A simple and INEXPENSIVE way to re-create this type of flourish is shown in the following tutorial posted by Gabrielle Pollacco. http://mycreativescrapbook.invisionzone.com/index.php?showtopic=499

I think I'm going to have to go buy a few bottles of the pearlized puffy paint for these little beauties!!!

There is also a Zva Creative rhinestone flourish in the Romance Add-On Kit...


Rhinestone flourish by Zva Creative

A tutorial for a hand made flourish made with rhinestones has been posted by Cristal~Pinky on Scrapbook.com...here is the link  http://www.scrapbook.com/videos/1261.html

Another variation...

If you would rather create these flourishes with Dew Drops...check out the following tutorial for creating hand made dew drops with hot glue!!!  The Frugal Crafter posted this great tutorial... http://thefrugalcrafter.wordpress.com/2009/01/06/make-your-own-dew-drops/


I can't wait to see your layouts with these beautiful (inexpensive) home made flourishes!!!

Tuesday, February 8, 2011

Free Journaling Block Downloads

I know lots of you might LOATH journaling on our layouts.  I personally love it!  I might not write a lot on every layout, but I try to get some "background" information for the pictures on the page.  I have to have an organized system for my journaling though, or else the memories will be forever lost.  I can't remember anything anymore if I don't write it down!!!  If you are interested in my system for easy journaling, feel free to see my blog post A Tip For Journaling On your Layouts.  I digress...

Back to the Counterfeit Kit...when I saw this journal block I thought it was the PERFECT addition to this month's kit.  It is free to download and print at the following link
http://www.mygrafico.com/freebies/vintage-journal-freebie/prod_2904.html (Scroll down towards the bottom of the page and you'll see a small, brown, "download" button...it was kind of difficult for me to see at first..click on it to download this journaling block image.)

Flourish Journal Block


There was a black die cut of a fairy in this month's inspiration kit, so I used it as inspiration and created the following journaling blocks from images that I found on-line at http://etc.usf.edu/

Fairy Journal Blocks
Click here to download the file Fairy Journaling Blocks

Bethany found some vintage library card images that are also free to download at http://www.tortagialla.com/2010/07/28/printable-library-journaling-cards/

If you didn't already have some journaling block options...I hope these help you out!

Monday, February 7, 2011

Faux Embossed Metal Embellishments


The "Romance Add On" Kit had these great metal bookplates by Teresa Collins...


I think these are very beautiful.  Irene Tan (aka Scrapperlicious) has an excellent tutorial on her blog at
http://scrapperlicious.blogspot.com/2009/07/metal-look-on-acrylics.html for creating faux metal embossed embellishments.  They are the PERFECT counterfeit of the Teresa Collins' Bookplates!

A variation on this tutorial:
Bethany has also recreated these beautiful frames for her Counterfeit Kit.  She used a slightly different technique.  She cut thin chipboard die cut shapes with her Cuttlebug. Next she dry embossed them, using texture plates and her Cuttlebug.  Finally, she heat embossed them using Silver Embossing Powder...and the result...STUNNING!!!
 

Hope you have fun re-creating the embossed metal embellishments!!!

One more tutorial for "faux mirrored embellishments"...
Thank you to KindleLover...here is a link to her tutorial for the "mirrored" pieces.  She is also doing a give away on her blog for a set of her "faux mirrors"!   http://kindlelover.blogspot.com/2011/02/tutorial-counterfeit-mirror-mosaic.html

Sunday, February 6, 2011

The Counterfeiter's Kits

And now for our versions of the Scraps of Darkness February 2011 Main Kit and Romance Add-On Kits...

Gabrielle's Counterfeit Kit:
Our Guest Counterfeiter did an awesome job putting her Counterfeit Kit together...

"When I first saw the inspiration kit, so many adjectives came to mind!  Dark, dramatic, romantic, and mysterious, to name a few.  I wanted to run out and buy every piece in the kit, but that's not really the point of this challenge!  I did purchase one thing, which was a pack of glass pebbles from the Dollar Tree.  Total cost - $1.  Luckily, I had some products that were similar to those pictured, and some that I could improvise on.  I knew I wanted to try and match the intensity of the inspiration kit, that was certain. 

I pulled many different pieces out of my stash, and will try to list them, if possible.  I first added card stock, because I think that is an important base for most scrapbook layouts.  I chose pink, dark red, black, and cream to coordinate with the patterned papers.

 
Cardstock
 
Patterned Paper(some partial sheets included):
My Mind's Eye- The Spider's Web (black/gray Dot)
Jenni Bowlin - Red Cabbage Flower
Scrap Within Reach - Industrial Park
Glitz Designs - Distressed Couture Vines
Tim Holtz - Idea-ology Seasonal Paper distressed red backside
My Mind's Eye - The Spider's Web Haunted Parlor
Graphic 45 - Communique Society Page
Basic Grey - Bittersweet Hand-Dipped
Tim Holtz - Idea-ology Seasonal Paper ATC Valentine images
Pink Paislee - Amber Road Apple Cider


Main Counterfeit Kit

Also included in main kit:
Prima felt embellishments - partial pack
Cosmo Cricket Tiny Type - ivory
MSL Mini Alphabet Set - black
Life Preservers Special Edition acrylic stamp set (Feb. 2010)
handmade "pebble" embellishments
distressed shipping tag - Eiffel Tower image from Internet/Daisy D rub on
Basic Grey Bling it on rub on and rhinestone pack
Prima flowers from can
tiny dollar store blooms - burgundy
May Arts crocheted black ribbon
eyelash yarn from stash
Cricut and Accent Essentials cartridge - black die cut heart
corsage pin tied with ribbon
Making Memories glittered brads - black/red
rhinestone hearts from stash


Add-On Kit

Add-on kit:
Tim Holtz Idea-ology seasonal masks
Maya Mist - red
homemade mist - black
Stickles- red/black
Stickles - pearl platinum
handmade cardstock flower - red
handmade ribbon flower - black
Cupid charm from an old earring
black velvet ribbon
red ruffled ribbon
Basic Grey Bling It "Love"
Basic Grey Opaline hearts
Shimmerz - royal red

I had a blast making up these kits, and I can't wait to see what each of you come up with!  I am excited to get started on some projects with my "Counterfeit Kit".  I think it will be perfect for some Valentine's Day projects.  A big thanks to Meridy and Bethany for having me as guest designer this month!" 

Meridy's Counterfeit Kit:

Oh boy, was this one fun!!!  There were lots of pieces/embellishments to copy in the main kit and the romance kit.  But apparently I couldn't stop there...I kept on adding more embellishments (I love adding embellishments to my layouts).  I plan on making some Glimmer Mists and Glimmer Glams to use on my layouts as well.   

I made my kits by copying the same "pieces" of the inspiration kits...but in a slightly different color scheme.  I don't use too much black in my scrapbooks, but I use LOTS of browns...so rather than a color scheme of pink, red, black and purple, I created my kit with a pink, red, and brown color scheme.

Meridy's Main Counterfeit Kit


Meridy's Counterfeit "Romance" Add-On Kit

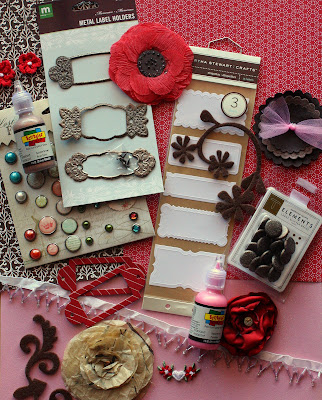
And, Since I just couldn't stop pulling embellishments from my stash of supplies, I grabbed all of these coordinating items as well!

Meridy's "Extras"
The only items I purchases were 2 bottles of iridescent puffy paint and a small bottle of "glaze medium" to use to re-create the Glimmer Glaze from the Color Add-On Kit.  (A few of the items in my kit you may recognize...they came from swaps I participated in last year...with some of you!)

Bethany's Counterfeit Kit:

This was an amazing kit to copy!  There were so many details and little pieces!  I just made a list and started checking things off as I pulled/made them.  Here are a few pictures of my kit.  If you would like more details, head over to my blog, Double Dog Dare You.  I did change a few things (added some embellishments, skipped some, changed up the entire color scheme) and made ALOT of things!  I am very excited about having a chance to play around with some paints and sprays that I am planning on making.  That is a somewhat new area for me, so I can't wait to get messy!

Entire Kit

Patterned Paper (by American Crafts)

Cardstock (2 of each this time!)

Main Kit Embellishments

Romance Add On
(I only picked a few things from this kit to use)

Color Add On
(I will make the paints and things as I need them.
Can you believe how many Pearl Ex powders I have
accumulated and never used?)

Link up your Counterfeit Kit Here for a change to win the original kit from Scraps of Darkness!