Showing posts with label Season's Greetings. Show all posts

Tuesday, December 31, 2019

Season's Greetings - December 31st - all the ideas!


Season's Greetings

Well, we've come to the end of the month and what a month of Season's Greetings it's been! 

We've crafted up a storm with greetings cards of all sizes, shapes, colours and techniques. 28 different ideas and many more different cards for your inspiration! 

We hope you've had as much fun as we have. 

Today I just thought I'd give you a round up of all the ideas we've offered. 

2nd - paper-backed die-cuts


3rd - a shaker card


4th - mixed-media background


5th - a sketch


6th - an all-white card


7th - ink blending


8th - washi tape


9th - giftcard cards


10th - hand-stitching and sequins


11th - pocket cards


12th - fussy cutting 


13th - non-Christmas colour scheme


14th - paper tearing


15th - a pop-up card


16th - sparkle


17th - punch shapes


18th - washi-tape tree


19th - silver or gold


20th - wood veneer embellishment


21st - stamped image with stacked die-cutting


22nd - layers


23rd - using what you know


24th - tags


26th - New Year aperture card


27th - small card with scoring detail


28th - using die-cutting


And that's a wrap! See you on the other side and here's to a creative 2020!

You know that we LOVE it when you share!

So, if you are inspired to make your own cards, layouts or projects - from Season's Greetings, a previous Christmas special, a Counterfeit Kit Challenge kit that you haven't quite used up or a new kit inspired by any one of our dozens and dozens of inspirational kits - you can share in these places:
Here's to a wonderful 2020!
Lisa

Monday, December 30, 2019

Season's Greetings - December 30th with Lisa


Hi again! I'm excited to be here again today to give you one last card idea before we say goodbye to 2019 and welcome 2020!

Season's Greetings

I'm quite a lazy card maker, heading for the easy techniques and repeating simple designs and today is no exception. I gave two different types of embossing a go and encourage you to try it too if it hasn't been on your radar for a while!  

Embossing

I ended up with five thank you cards which incorporated both dry and wet embossing and also a card which can go in my Christmas stack ready for next year.


  Of course - as always for me! - the idea in my mind didn't exactly translate to the page as I'd hoped for but I did try out a few ways of fancying up my embossing even if not all of them were successful. 


I started off dry-embossing a bunch of cards with an all-over thank you design. I had envisioned wet embossing the tops of all those words but that didn't quite work correctly - the embossing pad was not even enough and ended up on the background too. Fail! So I started off just using them as plain white and backed a couple of them with glitter cardstock and one with a plain paper.


I dabbed ink onto two other embossed cards and even though they are rather rough and ready, I thought I'd just keep them and embrace the imperfection!


For each of them, I created a small tag which I wet-embossed with a thank you sentiment. Again, not at all perfect and I don't really know what I'm doing wrong but I like to think that when people get a hand-made card, they don't worry about such small imperfections!


You know that we LOVE it when you share!

So, if you are inspired to make your own cards, layouts or projects - from Season's Greetings, a previous Christmas special, a Counterfeit Kit Challenge kit that you haven't quite used up or a new kit inspired by any one of our dozens and dozens of inspirational kits - you can share in these places:
See you tomorrow for more CKC inspiration!

Sending love your way, Lisa


Sunday, December 29, 2019

Season's Greetings - December 29th with Lisa


Hello again! Lisa here hoping you had a wonderful few days and are now able to enjoy a few quieter days before the New Year comes along! Busy times round here. But I'm happy to be back again for another idea for.... 

Season's Greetings

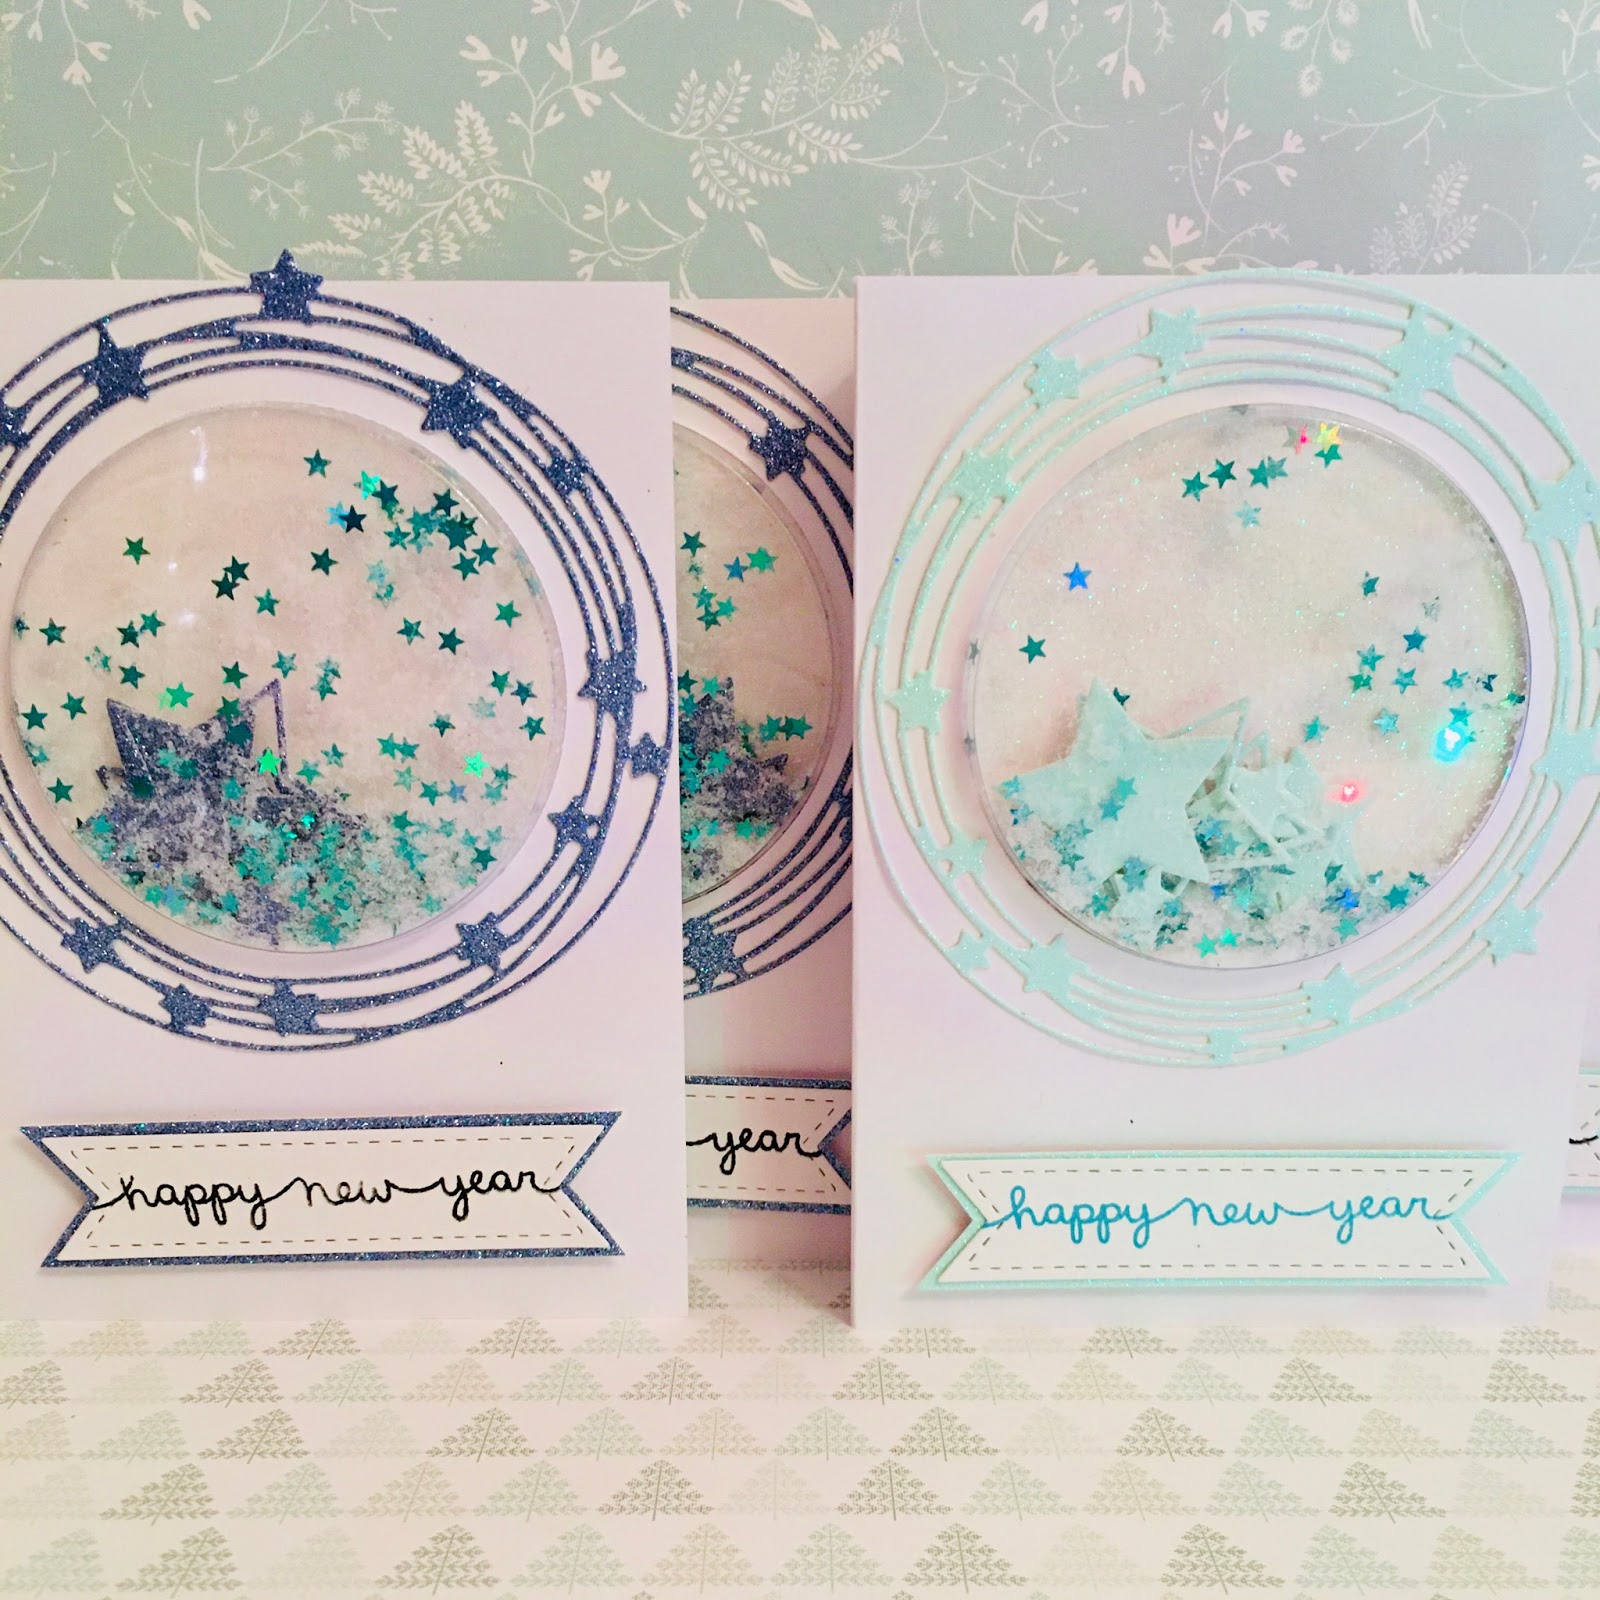
I have a confession to make! I didn't end up making or sending more than a handful of Christmas cards (hangs head in shame) so I've decided to take the idea I had for some of those not-sent Christmas cards and make them into New Year cards instead. I call this technique...

Christmas inspiration... one step further


I was given the idea of a fabulous shaker card in my crafty Thursday night crop and got myself all the elements to make my own - the die, some glitter paper, a new stamp, the tiny sequin stars and especially fine snow for the shaker element and then promptly did nothing with them. But I had an overall idea for what I wanted it to look like and thought they would look pretty so why not tweak that inspiration a little to work for a set of New Year cards instead. And when going to the effort of making one, why not make four instead?


I changed the colour of the glitter cardstock to an aqua and shade of blue which I thought was less festive and better for the new year idea. And then I tracked down  stamp set which would work for the sentiment rather than the lovely Christmas messages I'd originally bought.

The circular star die has a star element which also cuts out all the larger, matching stars I've included in the shaker element which is a great extra. I'm usually a bit stingy to buy too many dies but I treated myself to this circular die which I thought could be really useful in different designs as well as some nested squares, a set of stitched-edge circles and this stitched-edge banner set too. I think I'll really get a lot of use out of them so I'm really happy with them!  


I first cut out all the die elements in glitter paper as well as a white glitter circle for behind the shaker element and the banner. Next up I cut out the circle for the shaker "cup" to fit into and glued the cup in place.

I then filled it up with snow, sequins and and the glitter stars before backing it with the white glitter and then tidying up the back with a standard white cardstock for the whole of the inside.


Next up came the front with the glitter star die shake glued in place as well as backing the banner with some more glitter and raising that on foam squares.


To be honest, these took me a long time because I was trying stuff out while I was doing it and chatting too much to my crafty friends but once you have the technique, you can definitely run off a bunch of these production style!


I hope you are inspired to take a design you already have and tweak it to fit the occasion! I have to say that I'm pretty pleased with these and will try to come up with some other designs to use my shaker elements and die cuts. Will you join me?


You know that we LOVE it when you share!

So, if you are inspired to make your own cards, layouts or projects - from Season's Greetings, a previous Christmas special, a Counterfeit Kit Challenge kit that you haven't quite used up or a new kit inspired by any one of our dozens and dozens of inspirational kits - you can share in these places:
See you tomorrow for more CKC inspiration!

Here's to the New Year! Lisa 

Saturday, December 28, 2019

Season's Greetings - December 28th with Cindy


Hi everyone, Cindy here with just a few days from New Year's Day. Are you ready? I host New Year's Day Brunch and have just a few more errands to run. 

Season's Greetings

What do you do when you have a few images that you already stamped and change your mind on how you are going to use them. I die cut the card front and put my image on the inside of the card.

Using
Die Cutting.


I started by stamping my image onto white cardstock with Versa Mark Ink and embossing with a recollection blue embossing powder. The image is stamped in the center of a 5 1/2 x 4 1/4 piece of white cardstock. I trimmed the snowflake paper a smidgen so that I could have a white border around the card front. I added washi tape to the wrong side of the die.


Using the Misti I centered the die onto the snowflake image, then pressed the top down so that the washi tape sticks to the top. 


Using a small metal ruler I slide more washi tape onto the die so that it will stick to the card front. I use a metal ruler to help me with the transfer.


The card front is now ready to run through my Cuttlebug. Be sure to open the card up so that it is only the front layers you are die cutting.


The next step is to align the image inside the card.


I stamped my sentiment onto vellum and embossed with white embossing power. The sentiment is going to fit on the inside of the card front behind the die cut. 


I add a piece of pattern paper to the inside bottom of the card to finish it off. Now it's time to stamp my envelope. I pulled out a couple of snowflakes and stamped and embossed with silver embossing powder. 


My Celebrate card is ready for a note on the inside and to be given out at New Year's Day Brunch. 


You know that we LOVE it when you share!

So, if you are inspired to make your own cards, layouts or projects - from Season's Greetings, a previous Christmas special, a Counterfeit Kit Challenge kit that you haven't quite used up or a new kit inspired by any one of our dozens and dozens of inspirational kits - you can share in these places:
See you tomorrow for more CKC inspiration!